

I wrote this tutorial because:
1. I wanted a step-by-step guide for those of us who don't know diddly about coding.
2. it was frustrating (and intimidating) to mess around with HTML when I'm not exactly tech savvy. I thought there could be someone else who could benefit.
In my attempts to make my active website, Ruffles And Rain Boots.com look nice, I wanted to craft a custom image for a featured Pinterest board but have it open in a new window.
There are other ways to do this, but using the Image Widget is just so easy!
Note: This tutorial involves delving into your template's HTML code. Do not be intimidated, but be mindful. If you create a back up and are careful, you will have absolutely no problems altering this simple code.
I am not a coding expert or a developer, so if this doesn't work for you, please refer to the resources at the end of this post. Please don't contact me for Blogger coding help - trust me when I say, I am not the gal for that.
1. Create an image. I used the free website www.picmonkey.com to create the image you see here and pulled in some free Pinterest icons to help people recognize it. Using PicMonkey is easy, but you can use Photoshop, Canva, Pixlr or any other site or program.
You can also use a photo with some text on it for your "About Me" section, directing your audience to articles you are trying to promote, or even to beg for advertising space. The sky is the limit - it's your blog, do you whatever you want!


3. After opening, you will insert your image from your computer. Tip: use "<!-- -->" in the title for any widget you don't want to name.

4. Insert the URL link for your destination, and note that you might have to click on "Shrink to Fit"" before saving the widget. I sized mine so that it would not need to be shrunk down. Image above.
You also need to save your Layout arrangement once your widget has been saved (it might take a bit).
Easy, peasy til now. Don't get scared - the next part involves HTML, but it is SO easy it's kind of ridiculous.
5. Select Template from your Blogger menu (at time of posting, look in the upper right hand corner and it's a button titled, "BackUp/Restore"). Back up your template by saving it. Don't skip this step. It's fast and easy and you will rip your hair out if something goes wrong and you didn't do it.
I recommend backing up anytime you are about to make a change and / or once per month to catch any small changes you might have made.
Now, to continue, you will need to know the name of your element/image/gadget. If you don't know what yours is, you could put it at the top of the sidebar so that it sorts first in Blogger's HTML code or you could go the easy route and just "inspect the element." To do that, open your published site (your blog page that the public can see), right click on the image (after you've followed the steps above to publish the image to your site), and select "Inspect Element."

What will open might be scary, but
a) don't type or touch anything! Just kidding. If this makes you nervous, you can always go the Layout screen and find it. Helpful Blogger Tips takes you through it here.
b) the element is automatically highlighted for you, and all you have to do is find the Image name. You can see here that mine is "Image1."

Now you are ready to find the element and type in a ridiculously easy fix.
Take a deep breath. And remember, that you can click on any image below to make it bigger.

Click on "Jump to Widget" by selecting the drop down arrow.

A list of all of your widgets appears and you need to scroll to find the one we need to re-code. Once found, select it by clicking on the name.

8. It will bring you directly to the lines of code you need. But some are hidden. You will see this:
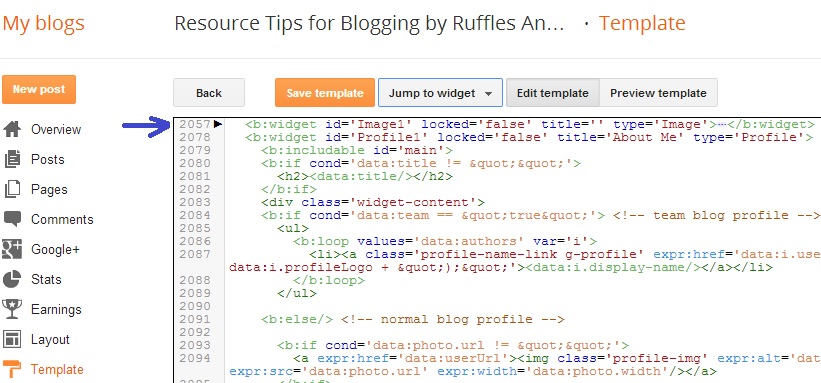
You see how it gives you a little black arrow to the right of the line number? Do you also see how the line number jumps from 2057 to 2078 (on my code, yours could be different).
That means you need to expand the lines to see the code. It's quite easy to do: just click on the black arrow to the right of the first line of code for our element.
9. You see how it moved? The little black arrow now sits at line 2058, but there is still so much code hidden. Click on the black arrow to the right of the new line number.

10. Oh, holy crap! Do you see all of the precious line of code that is causing the frustration? Don't hate it too much, it's not the code's fault.

Within the blue bracket in the picture below, you will see two pieces of data that say, data:link and that is where we need to start. Don't worry, you're almost done.

11. Locate the second instance of data:link. Immediately after the data:link' type a space and then target='_blank' before the closing bracket that looks like this >. Do not add punctuation, additional spaces, or hit the enter key. Just type it in. Note: some of your code below this line might turn red until you finish typing, but it will change back to green. If it doesn't change back to green, check what you typed. If you can't figure out your error, hit the "Back" button above the code and DO NOT SAVE it when prompted. Try to run through these steps again.
Always make a note of what line of code you are changing. Trust me, it makes it a lot easier if something goes wrong.

Open your active website (your blog that the public can see) and test the image link. It should open in another tab.
Other resources for tutorials for this are:
Urban Whisk here or Southern Speakers here.
Because I don't have any idea how to help you, please don't contact me for that. There are many online forums to help you (you could start with Blogger forums and Google searches). Best of luck.


No comments:
Post a Comment